Monday, July 18, 2016

On the subject of rolling stock!

Hey all! It's certainly been a while since I've last made an update here. I've had a lot going on between work and online school... and a potential second part time job... So it's been a little hectic on my end, but I'll share a few things with you guys.

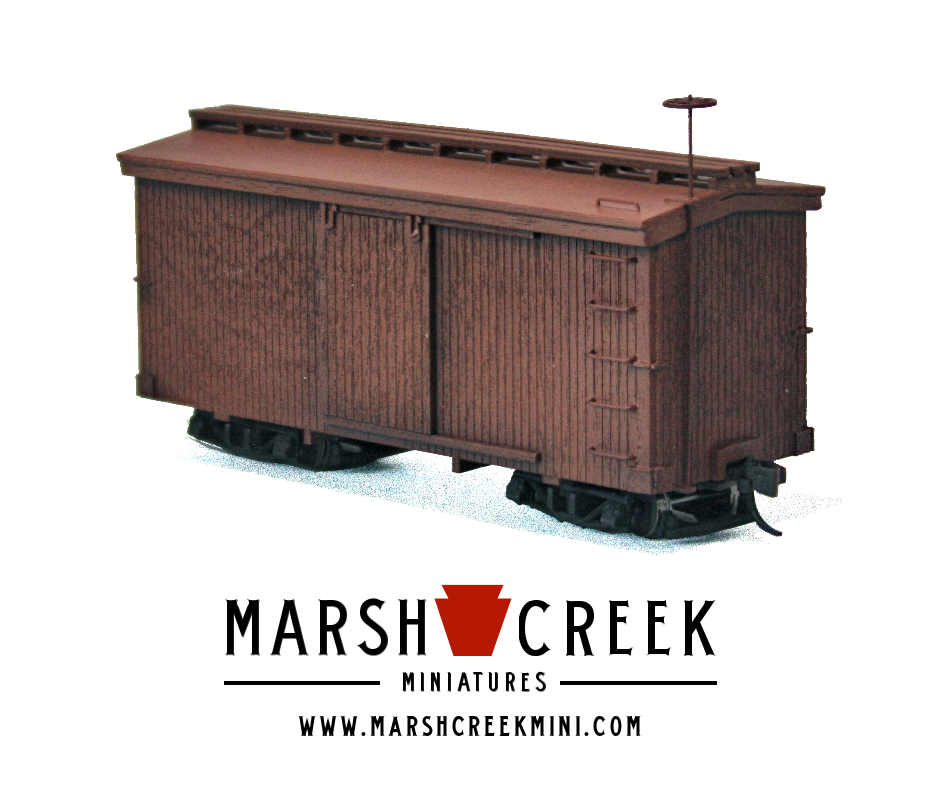
First up, as the title eludes to, I'll share my first piece of freight stock with you. It's a boxcar made from a Marsh Creek Miniatures kit. I have to say I was very, VERY impressed with the kit and highly recommend these kits if you're an HOn30 modeler.


Here the car is almost finished and it just needs the brake wheel and final touches. I still need to do some touch up paint on some of the car's "hardware", but the car itself was "painted" with artist chalk believe it or not! I stumbled across an amazing video tutorial by Joey Ricard of Trackside Scenery on YouTube. A link is provided below for you to check out.


I've seen a lot of tutorials for mimicking faded and weathered pain on wood, but this i have to say is one of the simplest, and yet, most effective methods I've ever seen! I had to pick my jaw up off of the floor when I was done watching. Although he used the method on a model structure I figured the same technique could be used on rolling stock. I won't go into detail on that as the video explains the process pretty well, just imagine the MCM boxcar kit being used instead.

I also happened to acquire a flat car/gondola 2-in-1 kits. However I'm still working on these cars and have elected to build one of each option. One flat car and one gondola, this way I have one example of each basic piece of freight stock on the roster.


Here you can see both cars in various stages of construction. The colored one in the background is destined to be the flat car and the "unpainted" one is going to be the gondola. The wood was given an ached color with a solvent based stain with flat black paint and thinner. The gondola will be given the same oxide red color as the flat car and boxcar when finished.

The trucks of these cars will also be from Marsh Creek Miniatures using their wonderful 3D printed trucks. Here I've placed one on the end of a bamboo skewer before it was primed and painted. They're fairly small, but a lot tougher than I was expecting. I though that the medium used to print these would make them brittle and thought they would break easily. I'm glad they're more durable than I thought they would be, but I would still take great care when handling them.

To paint these trucks I soaked them for about 20-30 minutes in denatured alcohol and then rinsed them thoroughly with distilled water. I let them dry for a few days before priming them with Model Master flat grey primer. That's my personal preference, though sadly I ran out of that and had to use some Rustoleum gre primer for the rest. It's a bit grittier so I imagine the pigments aren't as fine, sadly. But it worked for the most part. I let the primed trucks dry for several more days before spraying them with Model Master flat black. The trucks are intended to use Fox Valley Models N scale wheels and work pretty well. Though you may need to ream the axle journals a little with a fine drill bit to get them to roll more freely.

As you can see, even with just the boxcar, I have a nice little Mix Train! I'll post some more shots of the rolling stock when they progress a little further and I've made some more progress on scenery. I'll post pictures of that in the next edition!

Saturday, April 9, 2016

Progress

Greetings all and welcome back for another update!

Between work, school, and other priorities in life (as I'm sure we all can relate to) progress is slow. However there is progress none the less! Two layers of pink foam board have been glued down as well as some road bed. The creek is still being worked with, but the basic track of it is in place. I've also started work on the sub road bed for the grades.


As you can see there is a bit more done than the last few photos of the layout, though there still is a long way to go. The roadbed is Woodland Scenic's N scale "Trackbed", which is supposed to be a sound deadening foam material. My original plan was to use a layer of homasote and then glue foam board on top of that. However finding a sheet of homasote was difficult with the nearest supplier being about an hour's drive from here. I didn't feel like waiting around so I just slapped down an inch's worth of foam for a scenery base. The track plan was then marked out with a sharpie. In order to keep my curves a consistent radius I used a scrap section of foam and a bamboo skewer. The skewer was inserted into the foam at the curve center point. then in the scrap foam I measured 8 inches and then made another hole to hold the sharpie. Most of my curves are 8" radius, with one acceptation. as the line climbs up it crosses over the creek and then hugs a steep mountain side. Then curves into a tunnel on a 6" radius curve which broadens into an 8" curve. Since this is, I think, considered a compound curve I plan to use a section of N scale flextrack to help make the radius transitions smoother. I will also use N scale flextrack in my tunnels to minimize the possibilities for derailments.


Here's another view of the layout, but from the opposing side. I think my little mixed train makes a good scale reference for the size of the layout, which just as a reminder is 5'x18". I still need to finish laying the roadbed for the lower return loop, most of which will be concealed by a tunnel. 


This picture is of the beginning of the grade that will climb and cross over itself, twice, before reaching the upper return loop and the layout's only industry. And that will be a mine of some sort.  I know sever minerals were mined in the Cascades, everything from gold, silver, and even coal! Which mineral I want the mind to produce is still up for debate, but more on that another time.

The grade is a steep 5%, give or take a few scale inches. Using a 20' boxcar I made a paper ruler that is about 100 scale feet. And then further divided that in increments of 5 scale feet. So for every 100' of travel the line climbs up 5 feet. This is just to establish the grade itself and I'll come back and create a stronger foundation for the grade with foam scraps and expandable spray foam.


This is a close up of the creek so far. Granted it's a creek and not a river, but it seems too shallow to me. Plus I want to have some small rapids with rocks and such here so I feel that the creek should be deeper. I may just cut out the whole creek down to the base board and then back-fill and shape the creek with plaster.

That's about all for this update. Thanks for stopping by and stay tuned for more!


Friday, March 25, 2016

Scenery, Bridges, & Hand Laid Track!

One of the biggest personal challenges of the Roaring Creek line is that it will almost be exclusively be built with hand laid track! And there are several reasons for why I chose to do this. First and foremost, scale realism. I am a HUGE detail fanatic and anything that could "ruin" the scale illusion is a massive eyesore to me.

Peco makes some nice looking HOn30/009 flex track, but there is one big problem with it... the rail is too big! It's somewhere around Code 80, which in HO scale is far more appropriate to HO standard gauge rail than narrow gauge. Code 55 is a much better option, though I had considered using Code 40, but was concerned with the tracking of trains. Craig Tice used Code 40 for his HOn3 Mojave & Panamint Railroad.
As you can see it was used to great effect! Code 40 would probably work for me and the RCNG, but just to increase my chances of reliability I've chosen Code 55. So as to be on the "Safe Side" if you will.

Anyway, to practice my technique on hand laying track I'm building a small diorama. I'm also going to use it to practice some scenery techniques also.


I found a small plaque to use as a base. The idea is to make a small station scene with a crossing, water tank, and a few rocks and trees. The ties were cut by a Northwest Shortline "Chopper" and then were weathered by scoring each side of the ties with a hobby saw to enhance the grain detail. The ties were then dipped into a solution of Vinegar and Steel Wool to give them the aged color you see here.

Although I don't have a place to put it at the moment, I've also started construction of one of the high bridges for the layout. I had originally bought a kit for an A-Frame bridge and trestle, but it was scaled more for road and wagon traffic rather than use as a railroad bridge. So I took the drawings and scaled them up so that it would be more appropriate for small narrow gauge use. Below is a photo of the bridge deck.

My only gripe is that I spaced the ties too far apart. I neglected to notice this as I followed the plans to build the bridge deck. It's a small oversight, but I can live with it. There's a total of 5 bridges that need to be built, however there is a possible 6th. I won't make the same oversight on them when I do get around to constructing them. Also you can see my 0-4-0 and Minitrains Combination car. A general consist will be what you see here, but with a flatcar, boxcar, gondola (all made from Marsh Creek Miniatures kits) and with the combine trailing at the end. I rather like the idea of using a combine instead of a caboose. I'm not sure if it's purely an aesthetic reason or just personal style. I know the EBT was known for doing that, as well as the Southern Pacific narrow gauge in the Owens Valley.

Next is a photo for one of many trees to be made. As I've said I'm a BIG fan of realism and most store bought trees don't do it for me, so I figured I'd try making my own! The technique follows one used in Malcolm Furlow's book on constructing the HOn3 San Juan Central model railroad. I highly recommend it myself as it has been FULL of awesome techniques for not just scenery, but for building a whole railroad! I refer to my copy often.

In the book he describes using lengths of 1/4" or 3/32" thick lengths of balsa wood, carved to form the trunk of the tree. Then he uses dried caspia to mimic the branches and foliage of the pine trees. The trunks are stained in a mix of alcohol and black ink to give it that dark grey look. I scored my trunks with a hobby saw to add extra detail.

In his method he drills small holes in the trunk and then inserts the branches into said holes with a small bit of white glue. I use Mode Podge, specifically the Matte kind which tries completely flat with no gloss or sheen to it, unlike some white glue. Furlow goes on to then spray paint his tree branches and then sprinkles fine ground foam onto them for added texture. I'm debating on whether I want to do this myself or just leave the trees as they are with the 'raw' dried caspia branches.

I have yet to finish a tree, but I'm happy with the results so far. I'll make another post on trees once I make some more progress. Until then I need to work on developing my ground cover techniques and the layout itself. Thanks for staying tuned! There's more to come!


Roaring Creek Narrow Gauge: Genesis and Inspiration

Alright, to start things off it has actually been a while since I've worked on a blog. Mostly due to personal reasons that have limited or kept me from being able to make much progress on my various hobby and model railroad projects. So here we go for Round Three!!

The Roaring Creek Narrow Gauge railroad is a freelance HOn30 "Mini Layout" that is 18 inches by 5 feet. I'm actually more of an O scale guy and prefer modeling On30 and the the narrow gauge modeling niche of On20. However, it is next to impossible to model an O scale layout that would be continuous running on a space not much larger than the top of a dresser. However the reason for parcially switching over to HOn30 was not for practical reasons alone to save space, but also because a close friend of mine had given me one of the wonderful Minitrains F&C 0-4-0 locos as a gift!


In August of 2015 I visited my friend and also helped him on building a HO model railroad for his dad, which really gave me an itch to build my own layout. Seeing as I'm living in a small apartment I have limited space, and after seeing HOn30 for the first time I saw the potential it had for model railroaders with limited 'real estate'. So with this new inspiration I began plotting a new layout to be built in the not-too-distant future.

The overall theme of the layout is inspired by the majestic Cascade Mountains of Washington State. A very select few model railroads have been set here and even fewer narrow gauge model railroads. I chose the Cascades as it breaks the Colorado narrow gauge stereotype. Of course there's nothing wrong with CO Narrow Gauge, after all it's what got me hooked on Slim-Gauge railroading to begin with! However I wanted something that was a bit different and unique. Then inspiration for the railroad's name came from a different source. On another trip with another friend of mine we were heading to a live steam club and while on our way there we passed a street sign called "Roaring Creek Drive". I instantly thought it would make a great railroad name, so I took note of it. And two or three years later I found a use for it as the "Roaring Creek Narrow Gauge".

I have a very active imagination, so I can easily see small little engines with short, stubby rolling stock trundling through landscape such as this:


Unfortunately with my 18"x5' limitations I won't quite be able to capture the grandeur of the Cascades, but I hope to at least evoke the feel of them.


Rolling stock will be supplied by both Minitrains, with their awesome line of passenger equipment: 


And Marsh Creek Miniatures with their awesome line of 20' freight stock kits!


I'll go into more detail about the kits as I work on them, but I can tell you they are an exceptional value and very well done!

Below is a photo of the "Layout" in its early stages:

The layout is comprised of a pair of old, abandoned modules from a defunct model railroad club. Each is 18x30 inches, so I decided to permanently bolt them together to form the bench work. I've made some considerable progress to the layout since this photo and will make a more detailed post about it in the future.

Well, that's about it for now! I hope I've been able to capture your attention so far, so stay tuned for further updates!